As our renovations - for many reasons - have come somewhat to a standstill, we've had some other projects going on. One of my pet projects, and this pun is totally intended, was to see if we could get some more chickens by actually hatching some chicks ourselves, rather than buying new ones.
My reasoning behind wanting more chickens was rather simple... we have almost enough eggs, but not quite. I think we can safely say that our 6 chickens - most of the times - provide about 4 eggs a day during peak season. But often it happens that there are only 2 or 3 and rarely we actually have six eggs in the coop. And even then we're not entirely sure that it's not an egg that was laid after our last visit the day before. Their egg-laying times seem to be all over the place.
But in addition, I have of course been reading up on how long chickens live and at what point they will lay less eggs than before. Based on this I established that our chickens basically have reached half-time and soon will start to lay less eggs. Considering that our chickens were about one year old when they started laying their first eggs, I thought we could start with a couple of chicks now, and then another couple of chicks the year after. So we could slightly increase the flock but at the same time also cover for any losses, so to speak.
The Preparation
Whilst I am not a big fan of AI, I actually do use it quite a bit these days (well, not on this website, as no AI would write as chaotic as I am). Well, having said that... I use CoPilot mainly as a Google replacement because I noticed it also comes up with a lot of s***.
So first of all I needed to check what I need to do to actually be able to breed and hatch chicks. As a matter of fact, our chickens are not very maternal at all. There are sunny days where the hens walk around in their enclosure and drop an egg as casual as other people chuck a cigarette bud in the middle of nowhere. And they just walk off. They don't seem to be broody at all and despite all of our efforts, none of our hens actually lay an egg in their own compartment. No... they one compartment to lay ALL the eggs, basically time-sharing their little hatch box. Which is fun for us to collect eggs from just one slot, but not helpful if none of the hens can be bothered brooding. So an incubator was required.
With that in mind, I was blown away how much those incubators actually cost, considering that they are basically a glorified egg cooker. For an incubator meant for up to 12 eggs (they obviously count in quail egg sizes) without any extras; which means no automatic rotation motor for the eggs, you can spend a whopping 150€ with very little comfort. With this in mind, I actually went for the cheapest model, but from a more recognised brand, rather than a no-name Chinese copy which only cost a fraction. It's the BRINSEA ECO II Mini. I have to turn the eggs myself, the temperature can only be adjusted via a screwdriver, there is no display for said temperature and no guarantee it will reach the temperature either. About that I'll write a bit more later.
Anyway, I didn't want to spend that much money on it and the AI actually pointed out, that these incubators are often resold for about half the price and I did indeed find one for about 60€ on Leboncoin. I didn't prepare for anything else, as I had little hope I would succeed. So surprise: this is the only prep I did. Googling and buying an incubator and hoping for the best (not really).
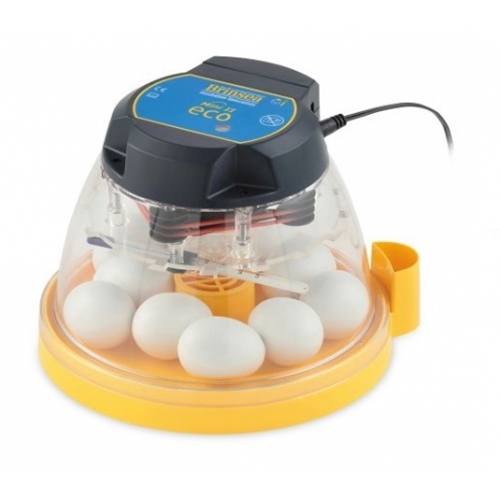
I used the Brinsea Mini II Eco. By all means, this is not a recommendation, it's just what I used as I could find it cheap enough on the second hand market, yet considered a quality product. Lots of information I found on incubators also said, to avoid products that are cheap as they are basically the same product but with different 'no-name' brands.
If you do have money to spend, I highly recommend an incubator that offers a rotation function. The one I used: Brinsea Website
First Try
One thing that I struggled with from the beginning, was the rotating of the eggs. From what I read and researched, you're meant to do that three times a day and I noticed quickly that this is the one thing that can easily be forgotten. As I mentioned before, there are some incubators that do have the automatic rotator in there, however the prices are rather steep. I also noticed that usually this is more common with the bigger incubators; probably because it would not be wise to uncover the eggs, let them get cold, whilst you are trying to rotate or flip 50 eggs or more. Generally, I'd say I did about two flips a day on average. Sometimes three, but mostly two.
The biggest struggle was getting the right temperature. Because there is no thermostat or visible indicator what the temperature is - or will be - it's really hard to figure out what to set it to. Now of course, every egg (duck/quail/chicken, etc.) have a different temperature requirement. But all I get with the BRINSEA ECO II MINI is a teensy weensy screwdriver and the option to turn + or - but nothing else to indicate what it will be. So you basically either hope, particularly with the used ones, it's already on the correct temperature or you prepare yourself to trial this out for several days. Basically change the temperature, wait an hour... lower or increase, wait an hour to see if the temperature is in the area you want it to be.
As the device is quite noisy (fan to distribute the heat) I actually wanted to put the indicator in a different room. But unfortunately it was not heated and it didn't matter what temperature I set the incubator to, it just never reached the temperature I needed. Basically, since this is only a plastic lid, the heat from inside the incubator dissipated so quickly in a room that was only 10°C that it never actually managed to heat up properly. As we were trialling this end of January, the house as such was simply too cold and we had to take the incubator back into the kitchen which was the warmest.
Something - I thought - was less worrying was the humidity. The incubator has an inside and and outside water container which is connected with a little tube at the bottom. So if you fill up on the outside it levels out inside as well (physics is magic!). So this was - at least in the first couple of weeks - easy to balance. Not much needed to be done other than topping up the water every other day.
It got problematic in the last hatching week. Apparently the humidity has to be quite high towards the end, but it didn't matter how much I filled up the water container in the incubator, it just never went higher than 50%. Luckily - again... with AI's help - I figured that cutting up a little sponge and dipping that into the fountain would then increase the humidity (did I mention the magical word "physics"?).
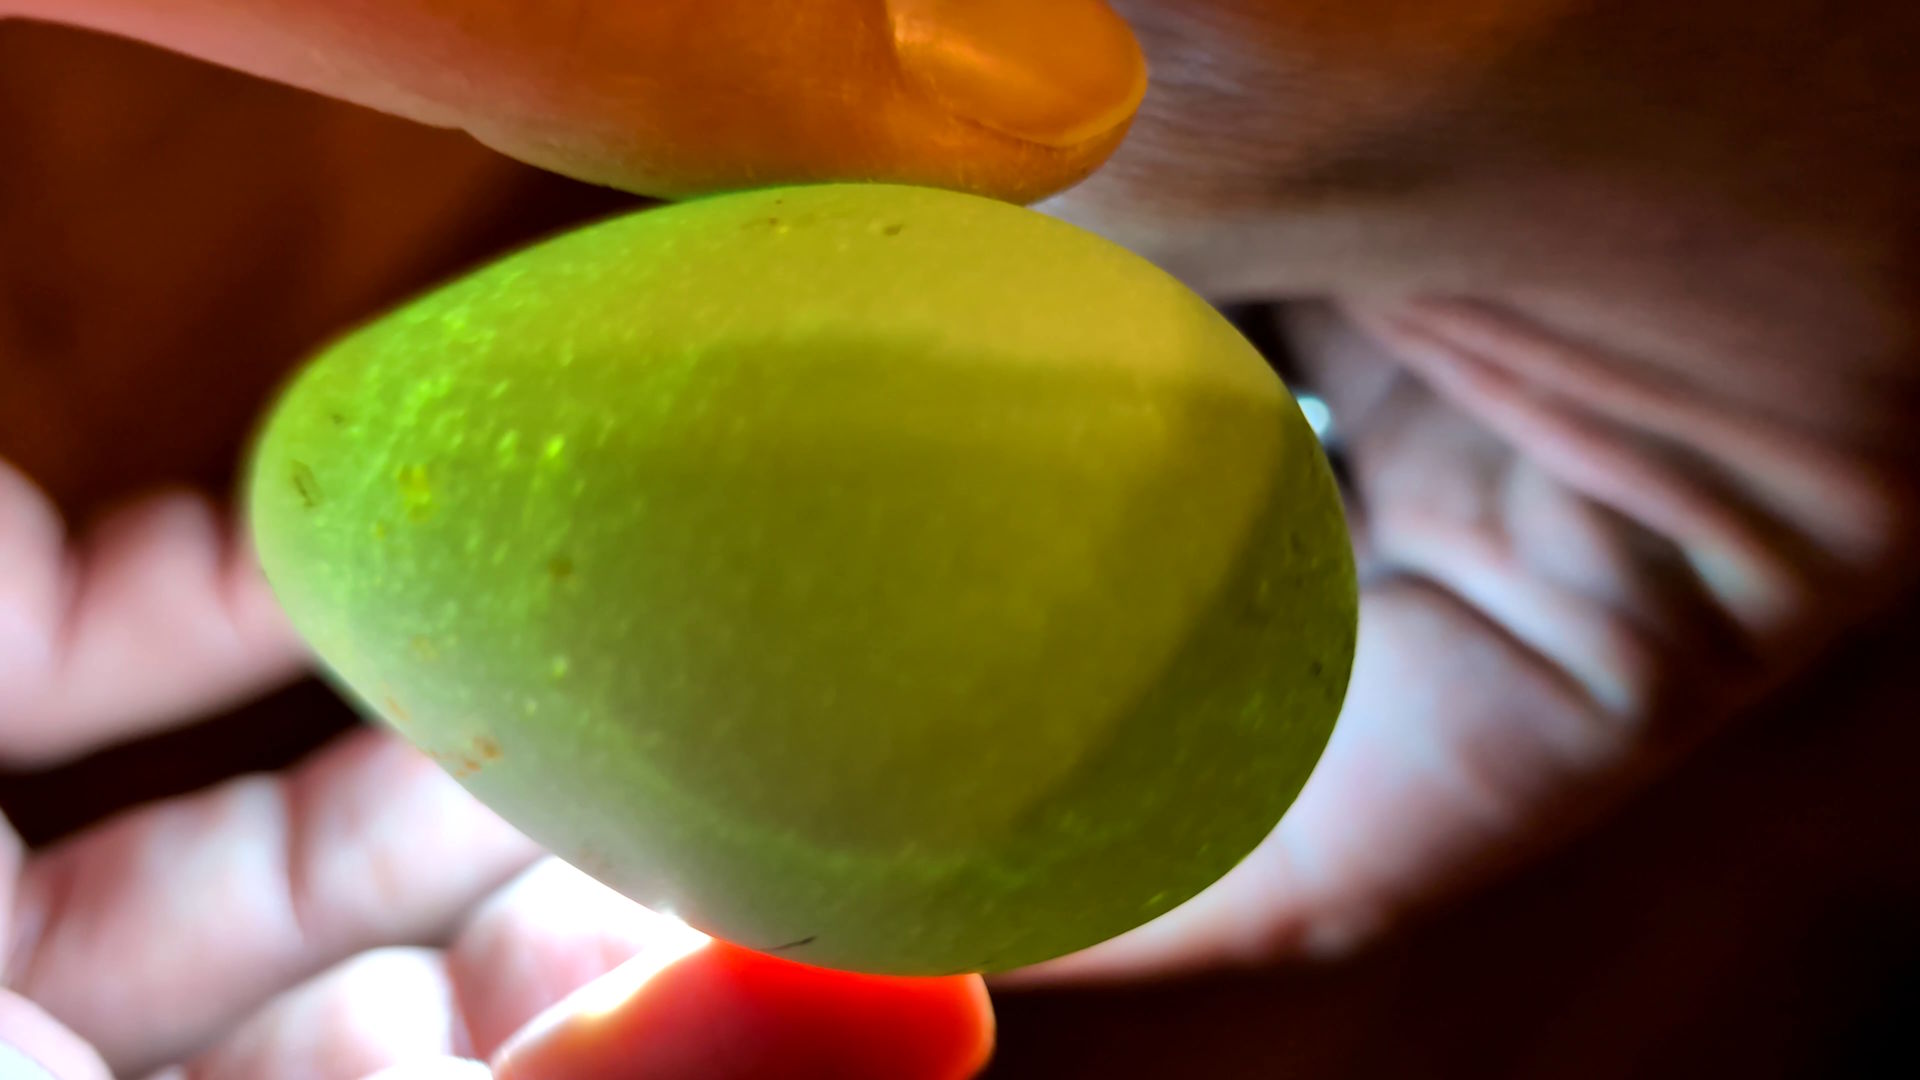
As you can guess by the original headline: it didn't go very well at all. After week one and two, you're supposed to have a look to see if anything develops in the egg at all. You do that by using a torch and basically shining the light through the egg, called candling. Based on the view (veins, blood pumping, a visible eyeball, and so on...) you're supposed to see if anything develops or if something has developed, whether it is still alive.
And there is the problem: we have opal and cream legbar chickens. Their egg shell is rather thick and on top of that blue. After my initial frustration thinking I am just too stupid to see anything, I figured that it's actually not me, but the apparently thick shells and particularly blue (and brown/black) shells are notoriously difficult to candle as the shine simply doesn't go through. Of those nine eggs, we found one egg that basically lit up like a disco ball when I put a torch on it and clearly nothing was growing in there and the shell was so thin and everything inside so liquid, there was no way anything would develop in there. The rest I just had to wait and see...
But in the end, it just didn't work out. None of the eggs were viable. Though there could be many reasons, I am not sure we can figure out exactly where it went wrong. I know for a fact I did not consistently rotate/flip/move the eggs three times a day, humidity in the beginning was fairly easy to deal with, but in hindsight the temperature might have been half or a whole degree too low. The problem is that the thermometer is quite high up, so not far from the heating fan, whilst the eggs were at the bottom. So my guess is also that it was just still too cold in the incubator.
When I finally manage to get my courage up to check the inside of the eggs, after none of the eggs hatched (I waited 3 days longer than necessary) I found out that only two eggs started developing chicks, which seemed to have died sometime during the process. But the remaining six eggs were just either not viable or didn't get past the "goo stage".
Second Try
I've tried finding out what the problem was with my first badge, if there was anything I did wrong. So I asked around and to my surprise the first answer most people gave me: you need a rooster. Well, as you can see from my previous posts, we have a rooster, so that wasn't the problem. Long story short, a bit of googling here, asking some knowledgeable people there... I didn't seem to have done that much wrong (other than probably not turning the eggs often enough).
The plan was then to try again. This time I restricted it to 8 eggs, as I did find the incubator a bit too crowded, particularly as I also had an additional temperature and humidity smart sensor which took quite a bit of space. It was meant to help me check the different temperatures on ground level (where the eggs obviously are) and the installed thermometer which is just under the heating fan.
The first two weeks there was nothing special to report as it was the same as with the first try. Though I did manage to candle the eggs so I could at least figure out whether the the egg white and yolk inside is still liquid (so whether I could see the air bubble move) and one egg was clearly not viable. Which left us with seven eggs.
I wasn't particularly hopeful as the first try did not result in anything other than two dead chicks but then in the last three days of the hatching cycle I suddenly heard a chirping. I was rather surprised about this since the incubator is rather loud and I only expected it a rather faint chirping from inside the egg. And then within two days we suddenly had five chicks stomping over each other. We were very excited.
It was rather difficult avoiding temptation to open the lid of the incubator. But information showed that it was possible to actually "shrink-wrap" any remaining chicks that may have broken the inner layer but have not hatched yet. But after almost three days we decided to transfer the chicks to a breeder hen (so a heating plate). This is when we noticed that there was a chick running rather late. We tried to help breaking the shell but were badly surprised when suddenly blood was running out of the egg. It was still moving so we left it alone for another couple of days. I took one of the sibling chicks and added it back into the incubator for moral and maybe also physical support to encourage the late chick to hatch. Though it did look like it was too late as the inner layer of the egg seemed to have gotten stuck to the chick and it seemed very week. So after another 24 hours I started helping the late chick hatch hoping it will survive.
We left both chicks in the incubator for another 18h or so when we started seeing the late chick actually moving about and drying up. The older chick started walking over it and getting a bit too pushy so we decided to move them to the heating plate instead where there is more space and where the other chicks were waiting already.


Auto-Sexing; does it work?
As I mentioned before in my blog, we also have this particular breed because apparently it can help finding out the sex of the chicks fairly early on before they start growing into big chickens or roosters. Unfortunately, even with the information available I did not quite manage to decide whether they are male or female. But this is where AI actually became quite handy. I literally took a photo and uploaded it and AI then started analysing the features of the chicks and determine the sex. Apparently we have six female chickens. Not quite sure whether AI was correct, but it was certainly interesting and I understood the logic. So we need to wait a little bit until it's time.
Interestingly they all look rather different and we haven't quite figured out yet, whether they will be white or brown chickens. They are currently growing their feathers and they have changed so much and can still change so much that any chick could still have any colour. So we're waiting... it's very exciting.
Where are they now?
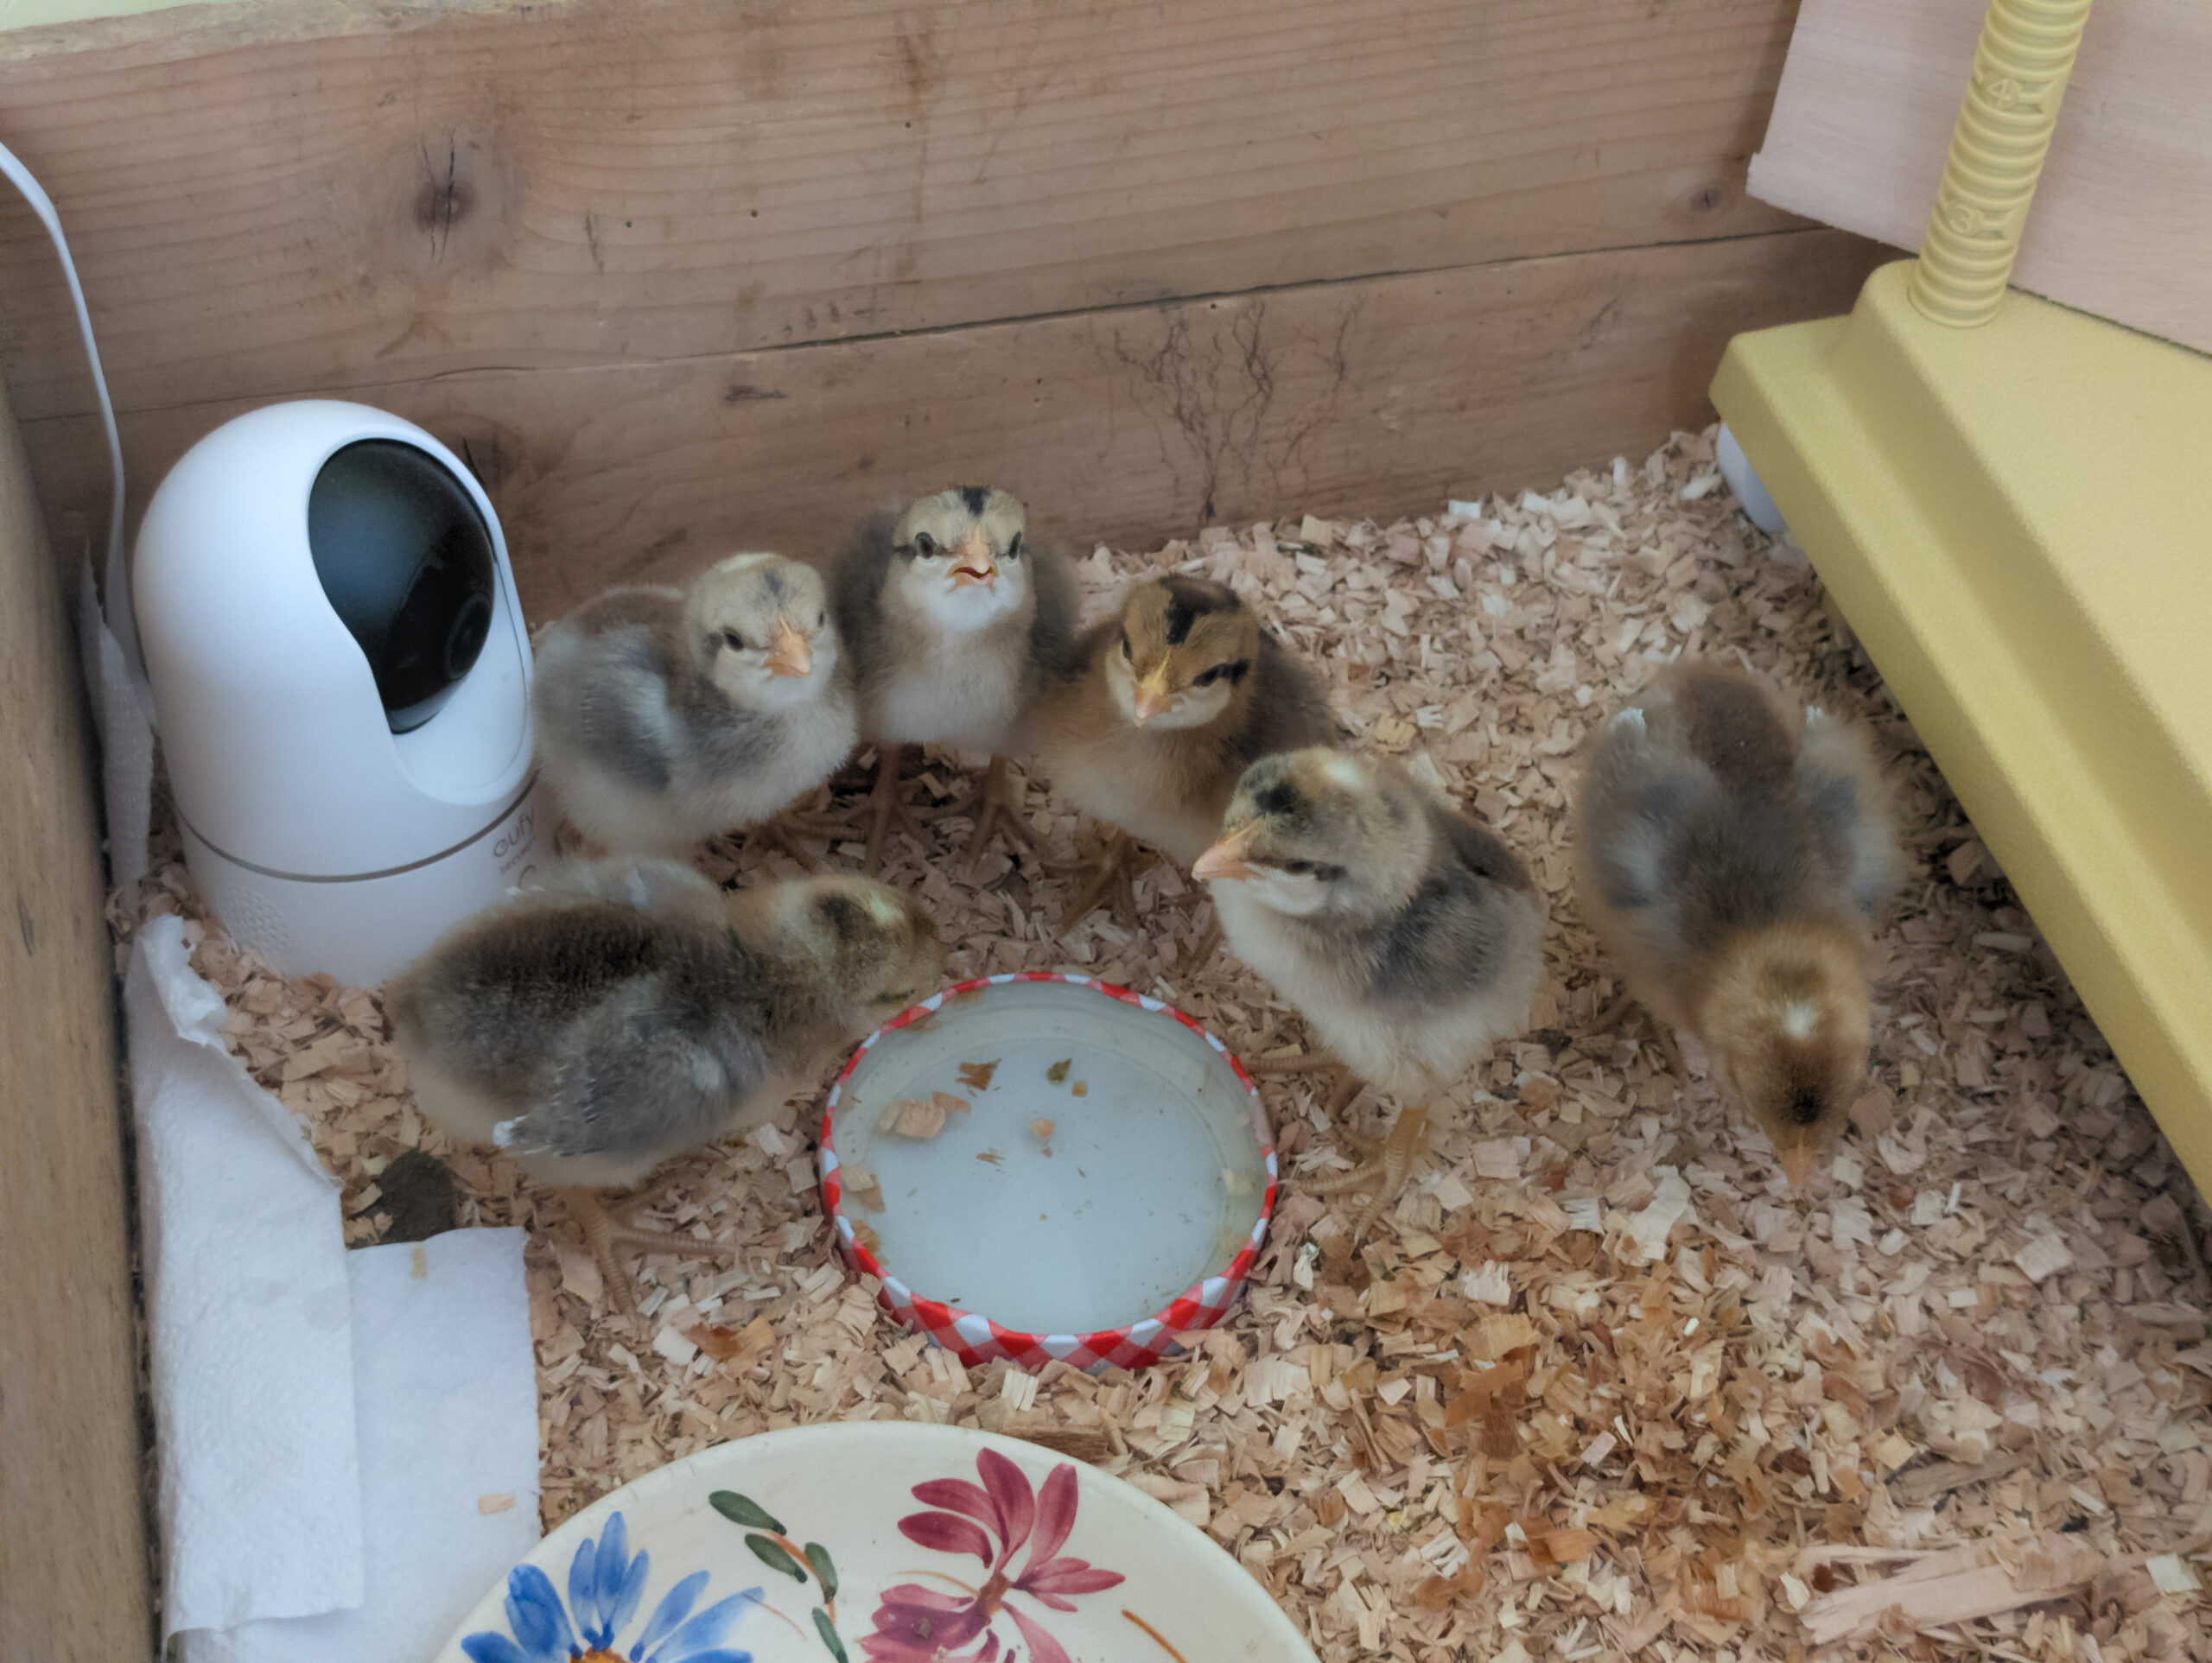
Well, originally we had them in a rather big wooden box but after a couple of weeks we noticed that they figured out how to jump out already and even though the box was quite big and the sides high enough, with the breeder hen (heating plate!) in there, it didn't look like there was much space, never mind water or food dispensers. So we were literally putting little jam jar lids in there with water and food and within 30min there was none left as it was all kicked about and knocked over.
We have now bought a little foldable play pen for little dogs. This gives them loads of space and then of course there is enough space for a proper feeder (they still kick the food out and about) and a water fountain (less messy now!).
I've been reading that it's best to wait until they are old enough before they go out to the big chickens and also introduce them slowly as there is a chance the older chickens may pick or heckle them. Not sure they will, I've been introducing the little ones already, one by one, sitting into the coop. The chickens - not even the rooster - were too bothered. But I noticed the little chicks were becoming rather crazy. The eldest one escaped twice only to run towards food in the chicken coop, grab it and ran away as if it's the Hunger Games. It was hilarious to watch. All the chickens looked like in disbelieve.
Anyway, this will be a different post, I suppose... if you managed to read up to here, thank you. 😉


